Java for a Windows
This article applies to:
-
Platform(s):ĀWindows 7, Vista, Windows XP, Windows 2000, Windows 2003, Windows 2008 Server
-
Java version(s):Ā6.0, 7.0
The procedure to install Java broadly consists of:
- Download
- Install
- Test Installation
Download Java
This process requires you to download an executable file that includes all the files needed for the complete installation.
- Go to any free java downloadĀpage e.g
(or)
- Click on the java version you want to download.
- The File Download dialog box appears prompting you to run or save the download file.
- ClickĀSaveĀto download the file to your local system.
Tip: Save the file to a known location on your computer, for example, to your desktop.
- Close all applications including the browser.
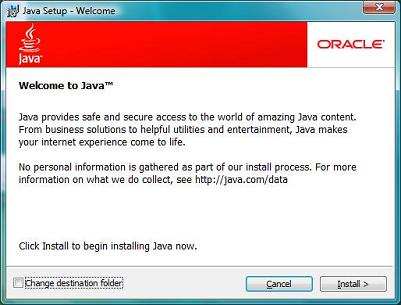
Install Java
You do not need to remain connected to the Internet during the installation.
- Double-click on the saved file to start the installation process.
- The installation process starts. Click theĀ'Install'Ābutton to accept the license terms and to continue with the installation.Ā.
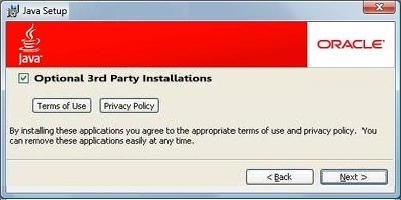
- Oracle has partnered with companies that offer various products. The installer may present you with option to install these programs when you install Java. After ensuring that the desired programs are selected, click theĀ'Next'Ābutton to continue the installation.Ā
- A few brief dialogs confirm the last steps of the installation process; clickĀ'Close'Āon the last dialog. This will complete Java installation process.Ā
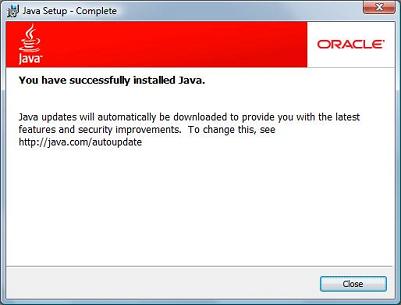
Note: You may need to restart (close and re-open) your browser to enable the Java installation in your browser.
Test Installation
To test that Java is installed and working properly on your computer, run thisĀtest applet.Ā
Java PATH Setting
Following are the procedure for setting up PATH permanently
Windows XP
- Select 'Start', select 'Control Panel'. double click 'System', and select the 'Advanced tab'.
- Click 'Environment Variables'. In the section 'System Variables', find the 'PATH' environment variable and select it. Click 'Edit'. If the 'PATH' environment variable does not exist, click 'New'.
- In the Edit System Variable (or New System Variable) window, specify the value of the 'PATH' environment variable. Click 'OK'. Close all remaining windows by clicking 'OK'.
Windows Vista:
- From the desktop, right click the 'My Computer' icon.
- Choose 'Properties' from the context menu.
- Click the 'Advanced tab' (Advanced system settings link in Vista).
- Click 'Environment Variables'. In the section System Variables, find the 'PATH' environment variable and select it. Click 'Edit'. If the 'PATH' environment variable does not exist, click 'New'.
- In the Edit System Variable (or New System Variable) window, specify the value of the 'PATH' environment variable. Click 'OK'. Close all remaining windows by clicking 'OK'.
Windows 7:
- From the desktop, right click the 'Computer' icon.
- Choose 'Properties' from the context menu.
- Click the 'Advanced system settings' link.
- Click 'Environment Variables'. In the section 'System Variables', find the 'PATH' environment variable and select it. Click 'Edit'. If the 'PATH' environment variable does not exist, click 'New'.
- In the Edit System Variable (or New System Variable) window, specify the value of the 'PATH' environment variable. Click 'OK'. Close all remaining windows by clicking 'OK'.
Below is an example snap for clear understanding :
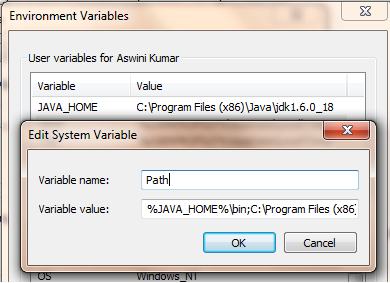
Note: You may see a PATH environment variable similar to the following when editing it from the Control Panel:
%JAVA_HOME%\bin;%SystemRoot%\system32;%SystemRoot%;%SystemRoot%\System32\Wbem
JAVA_HOME refers to the directory where java is installed. Variables enclosed in percentage signs (%) are existing environment variables.
Check Installation
You can check the basic installation with the following :
- Open a new shell and type
java -version
You should get a message like following
Java(TM) SE Runtime Environment (build 1.6.0_18-b07)
Java HotSpot(TM) Client VM (build 16.0-b13, mixed mode, sharing)
Note: For installing java in Mac go to www.java.com and Click 'Free Java Download' button and proceed with the instructions.
For more details please visit www.oracle.com or www.java.com